Least Privilege Are AWS IAM Policies Flying Under Your Radar
- June 01, 2020
Writing secure AWS IAM policies for applications is hard. Auditing them and ensuring the Principle of Least Privilege is applied is equally difficult. So much so that the solution involves big data. Yet, in our consulting experience, poorly written IAM Policies create serious security risks that fly under the radar of most security teams. As a result, this blog post walks you through the process of writing and maintaining secure IAM policies that make both developer and security teams’ work easier by automating the process and helping you address the #5 ranked OWASP Top 10 Web Application Security Risk.
Experiment Freely in Sandbox Environments
Native integration between different AWS services simplifies and speeds up innovation because you are not required to manage usernames, passwords or keys for these services to access each other. For example, a container running on ECS can be granted permission to access data in an S3 bucket by creating an AWS IAM policy and assigning it to the container. Without this policy, by default, the container does not have permission to access the S3 bucket or any other AWS services. This is called an implicit deny.
When experimenting with multiple services, it is common practice to grant more permissions than necessary until you get the services to work as expected. Under pressure to deliver features on time, many developers do not take the time to find out which exact granted permissions were not necessary and remove them. This opens the door to potential security risks. Instead, a Sandbox Environment is ideal for experimentation without worrying about Least Privilege.
Why is Least Privilege Important?
It is a well-known security best practice to only grant the permissions that are needed by your apps. This is called the Principle of Least Privilege. If you grant more permissions than necessary, the risk and scope of a breach increases. Should a hacker find a way to execute malicious code from your app, he can use the superfluous permissions to inflict more damage than if Least Privilege was used.
Over-Provisioned AWS IAM Policies
The diagram below shows the complexity of writing and maintaining Least Privilege IAM policies. Every circle represents a certain set of IAM permissions; only the blue circle should be assigned to the application to implement Least Privilege. The goal should be to go from the implementation on the left side to the implementation on the right side.
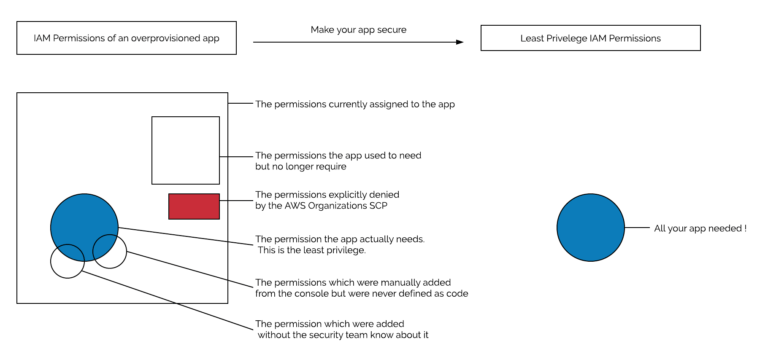
The Only Way is Up
The IAM policy below allows all actions on all resources in this AWS account. This is the least secure IAM policy, unfortunately, it is commonly used.
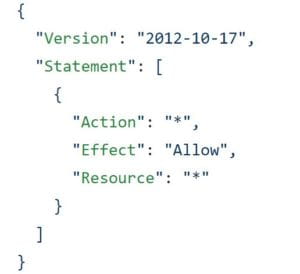
The CIS Amazon Web Services Foundations Benchmark has a rule specifically for this: “1.22 Ensure IAM policies that allow full “*:*” administrative privileges are not created”. You can use the AWS Config rule iam-policy-no-statements-with-admin-access to detect this kind of Policy and mark it as non-compliant. We do this when we create a new AWS account as part of our NTT DATA Build Cloud Foundations service which is used to create AWS accounts with a consistent security baseline.
Accelerate your cloud adoption with a secure cloud foundation, read about Build Cloud Foundations
Writing Secure IAM Policies
Get started on the path to writing best-practice IAM policies with Least Privilege applied with the following nine steps:
Step 1: Assign the Permissions you Think the App Needs
Below is an example of a Policy that is attached to a Role and assigned to an ECS Task Definition.
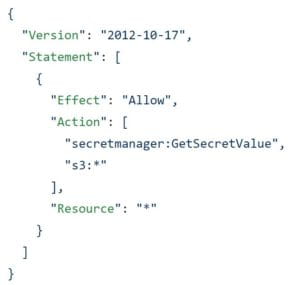
Each Statement has an Action, Effect, and Resource key. Effect can either be “Allow” or “Deny”. Action is the type of permission you would like to Allow or Deny. Resource represents the Amazon Resource Names (ARN) of the resource you are allowing those actions on. The AWS Policy Generator is a useful tool for writing such Policy.
This policy allows the container to read any secret and gives it carte blanche permission for all buckets in this AWS account.
Step #2: Break the Policy into Multiple Statements
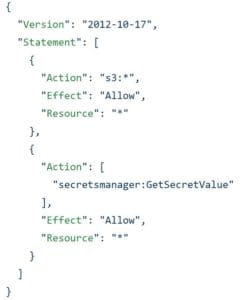
To make it easier to update later, it’s recommended that if your app needs access to multiple services that you give each service its own Policy or Statement within a Policy.
The example below applies the exact same permissions as above. Yet, it is easier to edit and improve.
Step #3: Use AWS IAM Access Advisor
The AWS IAM Service provides a handy utility called Access Advisor. You can find a tab for it if you open either a Role or a Policy.
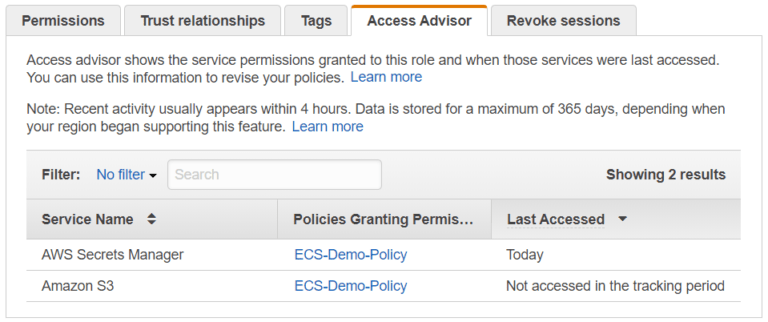
It shows you which AWS services were accessed, when they were last accessed, and which policy gave access (when viewing a Role).
In this case, even though access to S3 was given, it was never used and probably should be removed.
Below is the new version of the policy which only grants permission for the action required by the app.
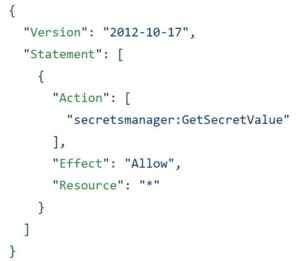
Note that while Access Advisor helps identify services that are not used, it does not provide detailed information about the specific Action used. In the screenshot above, we can see “AWS Secrets Manager” was accessed but we do not know if the Action was “secretsmanager:GetSecretValue” or “secretsmanager:DeleteSecret”. However, this information will be logged in CloudTrail when the app uses the Action.
Update 06/10/2020: AWS has updated Access Advisor to add the details of the Actions used for S3 APIs. Details for Actions of other APIs are still not provided by Access Advisor.
Step #4: No More Wildcards!
Wildcards (*) in a Policy means any. This is usually an indicator that the Principle of Least Privilege is not applied. Securing IAM Policies usually starts with removing wildcards.
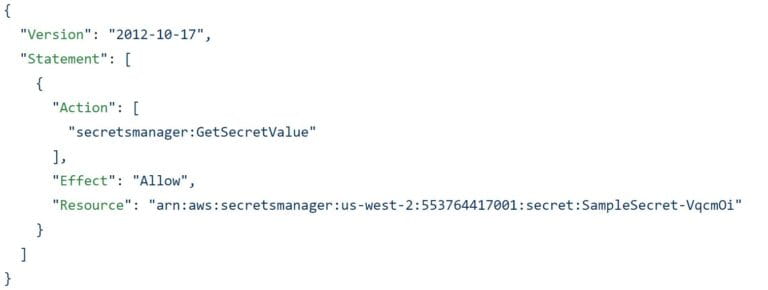
In the previous step, we are still allowing the Action on any resource. By replacing the wildcard with the specific ARN as shown below, we achieve Least Privilege.
Step #5: Implement AWS Organizations SCPs
SCPs (Service Control Policies) allow you to explicitly deny certain Actions from the master account. Even if the policy explicitly allows a certain Action, the explicit deny from the SCP will take precedence. SCPs are usually configured as part of the account factory.
Step #6: Give up and use AWS Managed Policies
AWS Managed Policies are easier to use than Customer Managed Policies or Inline Policies because they come with a predefined list of Actions. For example, AWSKeyManagementServicePowerUser includes 12 Actions (kms:CreateAlias, kms:CreateKey, kms:DeleteAlias etc…).
The downside is that Least Privilege is not achieved if you do not need all of the Actions included in the AWS Managed Policy you are using.. Additionally, if you take this path, you should be aware that AWS may add new Actions to your chosen AWS Managed Policy as the related service evolves.
Don’t give up, the interesting part is coming now!
Step #7: Implement Static Code Analysis
The best way to be reminded that your IAM policy needs to be updated to meet the security requirements is to implement a static code analysis tool such as cfn-nag for CloudFormation or Hashicorp Sentinel for Terraform.
Update 06.16.2020: AWS has announced the release of cfn-guard which verifies the compliance of CloudFormation according to policies that are defined as code.
Both tools go beyond the analysis of IAM policies, they can review any resource defined as code. While both tools are extensible, they come with a set of rules. Hashicorp recently released the Terraform Foundational Policy Library which aligns with the CIS Benchmarks.
Step #8: Use Tools to Identify Least Privilege Permissions
Repokid from Netflix and CloudTracker from Duo Security are two open-source tools that can be used to analyze CloudTrail logs and Access Advisor to generate a summary of your application’s IAM permissions.There is also a SaaS tool (currently in beta) called IAMKeeper which monitors the Policies in AWS accounts.
While Repokid automatically removes unnecessary permissions after 90 days, permissions can be overridden by the CD pipeline when the application is redeployed.
An alternate approach would be to take the output from CloudTracker and incorporate the result in your IAM policy defined as code. In the example output of CloudTracker below, the IAM Role “ecs-cloudformation-role” has Policy with the Action “apigateway:*”. CloudTracker gives you a breakdown of the Actions to retain, and the Actions you do not need. In this example, only five of 16 Actions were actually needed by the app.
(venv) [~/flux7/cloudtracker/]
flux7 -> cloudtracker --account solution-np --role ecs-cloudformation-role
INFO Source of CloudTrail logs: s3://cloudtrail-bucket/
INFO Using AWS identity: arn:aws:sts::111122223333:assumed-role/solutionteamnonprodadminrole/user@flux7.com
INFO Using output bucket: s3://aws-athena-query-results-111122223333-us-east-1
INFO Account cloudrail log path: s3://cloudtrail-bucket//AWSLogs/1111122223333/cloudtrail
INFO Checking if all partitions for the past 12 months exist
Getting info for role ecs-cloudformation-role
apigateway:createapi
apigateway:createapikey
apigateway:createapimapping
apigateway:createauthorizer
apigateway:createbasepathmapping
apigateway:createdeployment
apigateway:createdocumentationpart
apigateway:createdocumentationversion
apigateway:createdomainname
apigateway:createmodel
apigateway:createrequestvalidator
apigateway:createresource
apigateway:createrestapi
apigateway:createstage
apigateway:createusageplan
apigateway:createusageplankey
Step #9: Integrate these Tools in your CI/CD pipelines
If you have many development teams, writing multiple apps, each of which uses multiple IAM policies, you will quickly find yourself ensuring that the Least Privilege Principle is applied to hundreds of IAM policies.
Using the tools mentioned in the previous step will help. Yet, to make it a scalable and consistent process, they need to be integrated into your CI/CD pipeline.
The diagram below illustrates how this can be implemented.

- Developers writing code can get a very short feedback loop on the IAM Policies they implement by integrating a linting tool to analyze their policy.
- If developers use GitHub and CloudFormation, they can configure a Github Action that will scan the code of each PR. This will give the developer team visibility into code security. Here is an example of a Pull Request that does not meet security requirements — as indicated by the red cross
 .You can also add a badge to the repository as shown below. Once all policies meet security best practices, a failing badge is replaced with a green “passing” badge.
- The static analysis tool can be configured as a required step in the CI/CD pipeline, thus ensuring that code about to be deployed meets security requirements.
- The static analysis tool can be configured as a required step in the CI/CD pipeline, thus ensuring that code about to be deployed meets security requirements.After the app has been running for some time, Repokid or CloudTracker can provide feedback on the actual permission(s) used. This information can be used to report non-compliant resources in AWS Config. It should also be provided to developers so that they can update their IAM Policies based on suggestions generated from actual usage.
- Last, you can also automatically remediate non-compliant Policies by trimming unnecessary permissions directly in the environment.
The Principle of Least Privilege is critical to maintaining security best practices. Yet, it can be challenging to consistently achieve without a cohesive approach to consistently managing IAM policies. Ensure that your policies are not overprovisioned with these steps.
Looking for hands-on help to accelerate your cloud security? Reach out to our team today to build a secure cloud foundation.
Subscribe to our blog


